Open Source MLOps and LLMOps Orchestration with MLRun: Quick Start Tutorial


MLRun is an open-source MLOps and gen AI orchestration framework designed to manage and automate the machine learning lifecycle. This includes everything from data ingestion and preprocessing to model training, deployment and monitoring, as well as de-risking. MLRun provides a unified framework for data scientists and developers to transform their ML code into scalable, production-ready applications.
In this blog post, we’ll show you how to get started with MLRun: creating a dataset, training the model, serving and deploying. You can also follow along by watching the video this blog post is based on or through the docs.
When starting your first MLRun project, don’t forget to star us on GitHub.
Now let’s get started.
An MLRun project helps organize and manage the various components and stages of an ML or gen AI workflow in an automated and streamlined manner. It integrates components like datasets, code, models and configurations into a single container. By doing so, it supports collaboration, ensures version control, enhances reproducibility and allows for logging and monitoring.
This will create the project object, which will be used to add and execute functions.
%%writefile data-prep.py
import pandas as pd
from sklearn.datasets import load_breast_cancer
def breast_cancer_generator():
“””
A function which generates the breast cancer dataset
“””
breast_cancer = load_breast_cancer()
breast_cancer_dataset = pd.DataFrame(
data=breast_cancer.data, columns=breast_cancer.feature_names
)
breast_cancer_labels = pd.DataFrame(data=breast_cancer.target, columns=[“label”])
breast_cancer_dataset = pd.concat(
[breast_cancer_dataset, breast_cancer_labels], axis=1
)
return breast_cancer_dataset, “label”
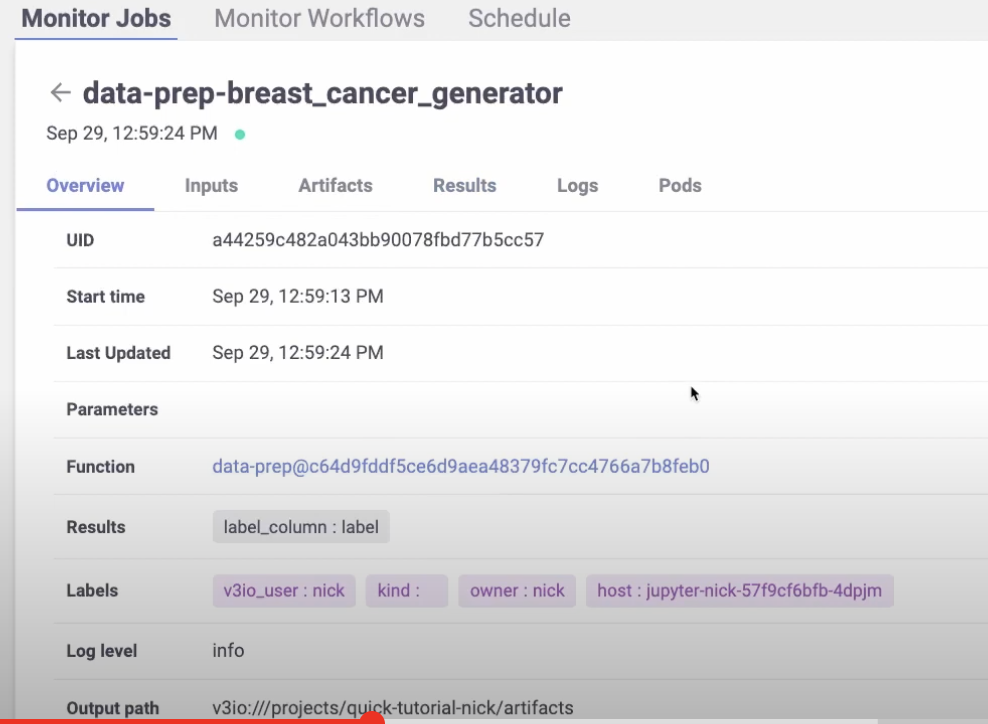
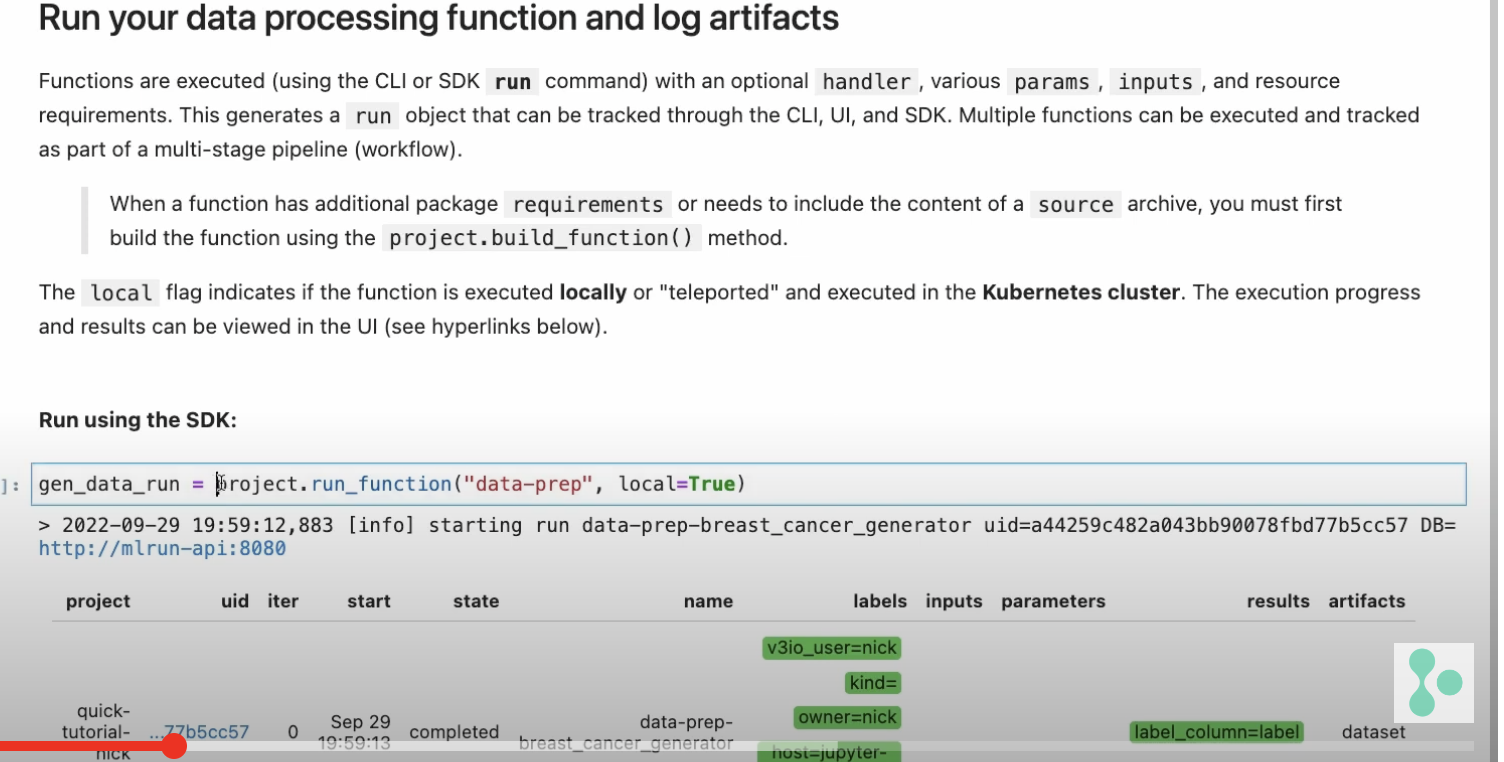
This is regular Python. MLRun will automatically log the returning data set and a label column name. 4. Create an MLRun function using project.set_function, together with the name of the Python file and parameters specifying requirements. These could include running the function as a job with a certain Docker image.
data_gen_fn = project.set_function(
“data-prep.py”,
name=”data-prep”,
kind=”job”,
image=”mlrun/mlrun”,
handler=”breast_cancer_generator”,
)
project.save() # save the project with the latest config
gen_data_run = project.run_function(
“data-prep”,
local=True,
returns=[“dataset”, “label_column”],
)
Now let’s see how to train a model using the dataset that we just created. Instead of creating a brand new MLRun function, we can import one from the MLRun function hub.
Here’s what it looks like:
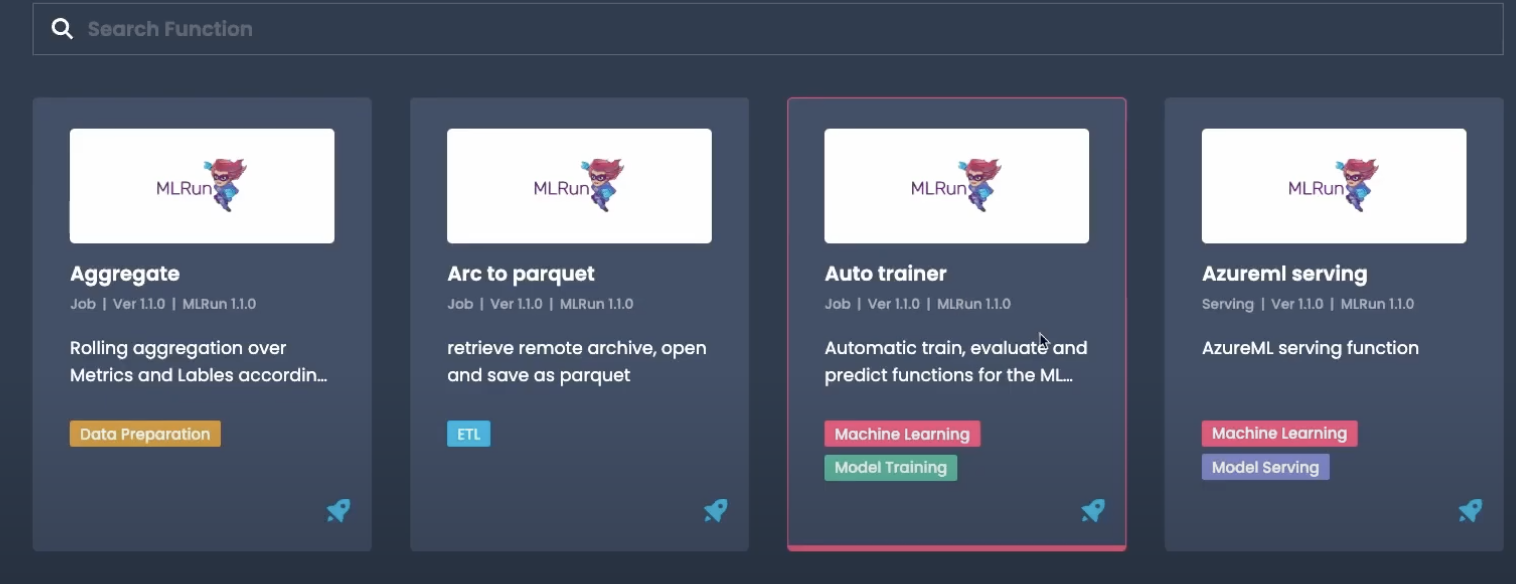
You will find a number of useful and powerful functions out-of-the-box. We’ll use the Auto trainer function.
# Import the function
trainer = mlrun.import_function(“hub://auto_trainer”)
In this case, one of the parameters is the data set from our previous run.
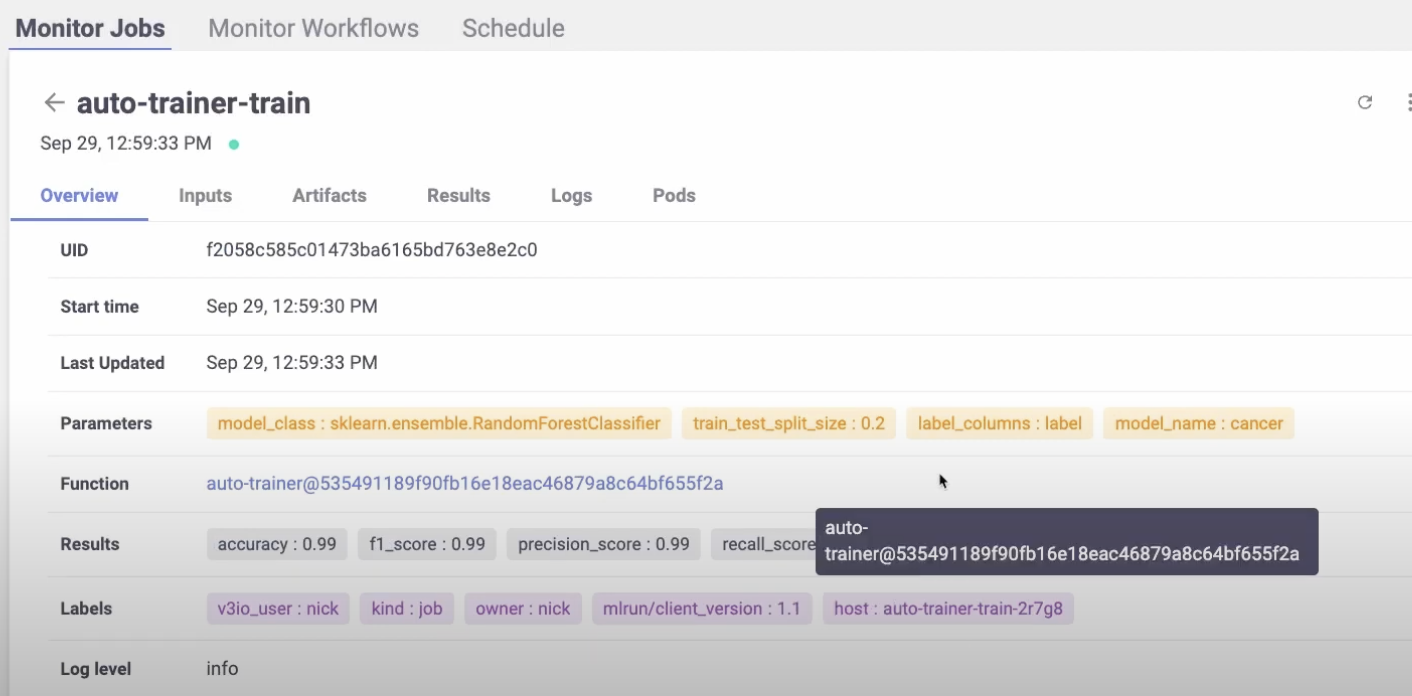
trainer_run = project.run_function(
trainer,
inputs={“dataset”: data_prep_run.outputs[“dataset”]},
params={
“model_class”: “sklearn.ensemble.RandomForestClassifier”,
“train_test_split_size”: 0.2,
“label_columns”: data_prep_run.results[“label_column”],
“model_name”: “breast_cancer_classifier”,
},
handler=”train”,
)
The default is local=false, which means it will run behind the scenes on Kubernetes.
You will be able to see the pod and the print out statements.
Now we can serve the trained model.
serving_fn = mlrun.new_function(
“breast_cancer_classsifier_servingserving”,
image=”mlrun/mlrun”,
kind=”serving”,
requirements=[“scikit-learn~=1.3.0”],
)
serving_fn.add_model(
“breast_cancer_classifier_endpoint”,
class_name=”mlrun.frameworks.SKLearnModelServer”,
model_path=trainer_run.outputs[“model”],,
)
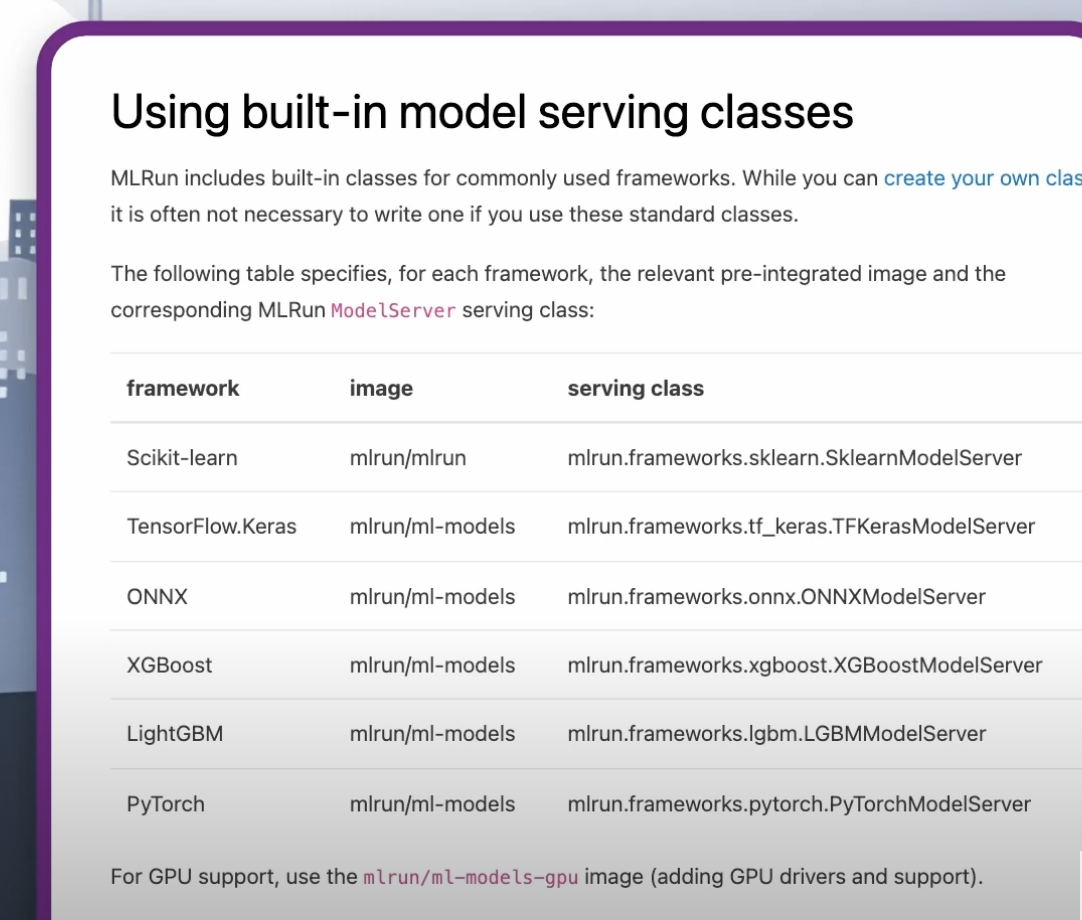
In this example, we are using sklearn. But you can choose your preferred framework from this list:
Or customize your own. You can read more about this in the docs.
The example below shows a simple, singular model. There are also more advanced models that include steps for data enrichment, pre-processing, post-processing, data transformations, aggregations and more.
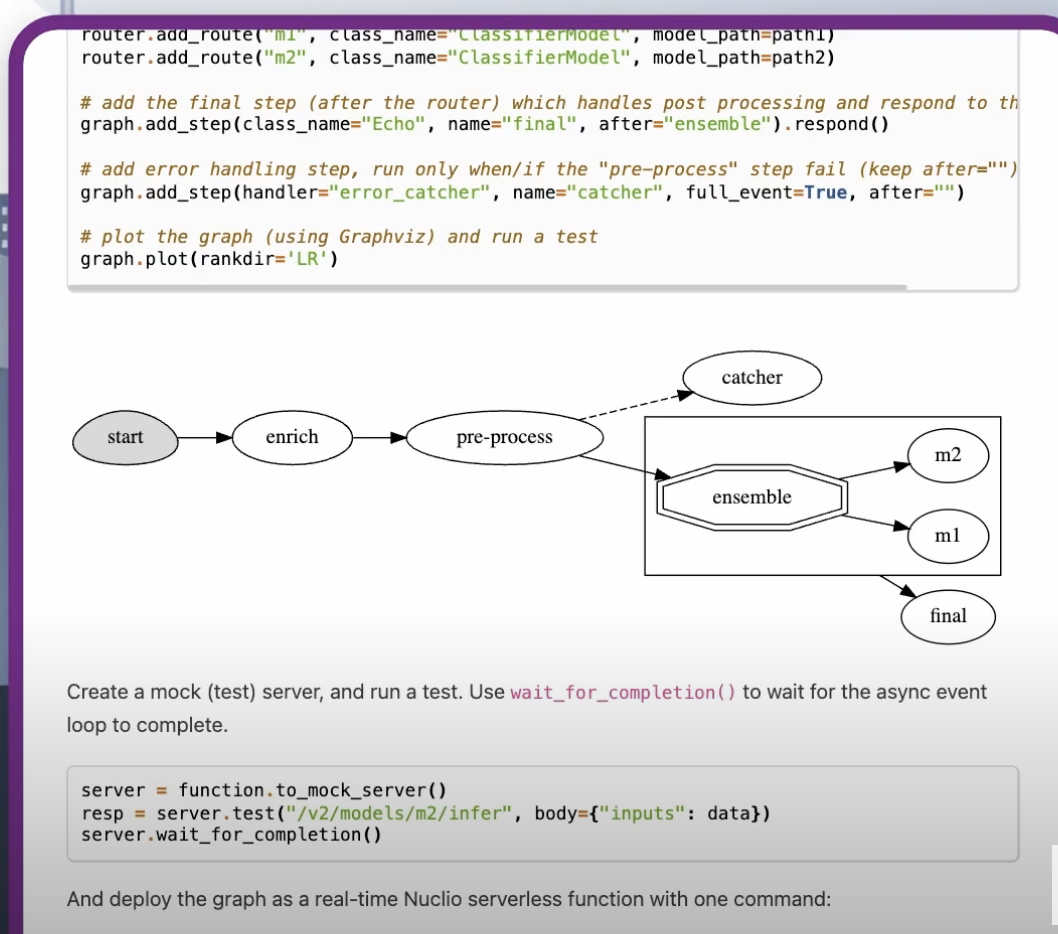
Read more about real-time serving here.
# Create a mock (simulator of the real-time function)
server = serving_fn.to_mock_server()
Use the mock server `test` method (server.test) to test the model server.
The last part of the code is the model server, which you can send data inputs to and acts exactly like a model server.
Finally, it’s time to deploy to production with a single line of code.
serving_fn.deploy()
This will take the code, all the parameters, the pre- and post-processing, etc., package them up in a container deployed on Kubernetes and expose them to an endpoint. The endpoint contains your transformation, pre- and post-processing, business logic, etc. This is all deployed at once, while supporting rolling upgrades, scale, etc.
That’s it! You now know how to use MLRun to manage and deploy ML models. As you can see, MLRun is more than just training and deploying models to an endpoint. It is an open source machine learning platform that helps build a production-ready application that includes everything from data transformations to your business logic to the model deployments to a lot more.
MLOps orchestration ties together all the moving parts of the AI/ML lifecycle into a coordinated, automated, scalable and responsible system. The critical components of MLOps orchestrations include data pipelines, model training and retraining workflows, CI/CD pipelines for automated deployment, and monitoring and governance layers.
Open-source MLOps tools provide transparency, flexibility, customization and cost efficiency. Moreover, open-source communities often move quickly to patch vulnerabilities, add features, and share best practices. This collaborative LLMOps ecosystem allows companies to future-proof with cutting-edge capabilities while retaining the ability to scale on their own terms.
Most orchestration frameworks are designed with modularity and extensibility in mind. They typically expose APIs, SDKs, and plugins that let you connect to existing data lakes, warehouses, message queues, monitoring systems, and CI/CD tools. You can also choose AI components for your LLMOps workflows like models you want to use, model connectors, etc.
Post-deployment monitoring involves tracking both technical and business performance of your models. Monitor metrics like latency, throughput, error rates, and resource utilization to ensure the model is serving predictions efficiently. On the data side, monitoring for data drift, concept drift, hallucinations and feature integrity ensures the model remains accurate as real-world inputs evolve. Open-source MLRun supports monitoring with internal dashboards or integrations with external reporting tools.
MLRun is designed to be highly versatile, supporting a wide spectrum of models and workloads. You can deploy traditional machine learning models (e.g., scikit-learn, XGBoost), deep learning frameworks (TensorFlow, PyTorch, Keras), as well as modern NLP and generative AI models. Beyond this, MLRun also supports deployment of custom inference logic, streaming pipelines, and ensemble models, giving teams the flexibility to adapt to different business domains.
